In this tutorial I will go over plotting locations on a Google Map using Advanced Custom Fields. The base of the code used to accomplish this is directly from the Advanced Custom Fields documentation found here.
Creating the Google Map Fields with Advanced Custom Fields
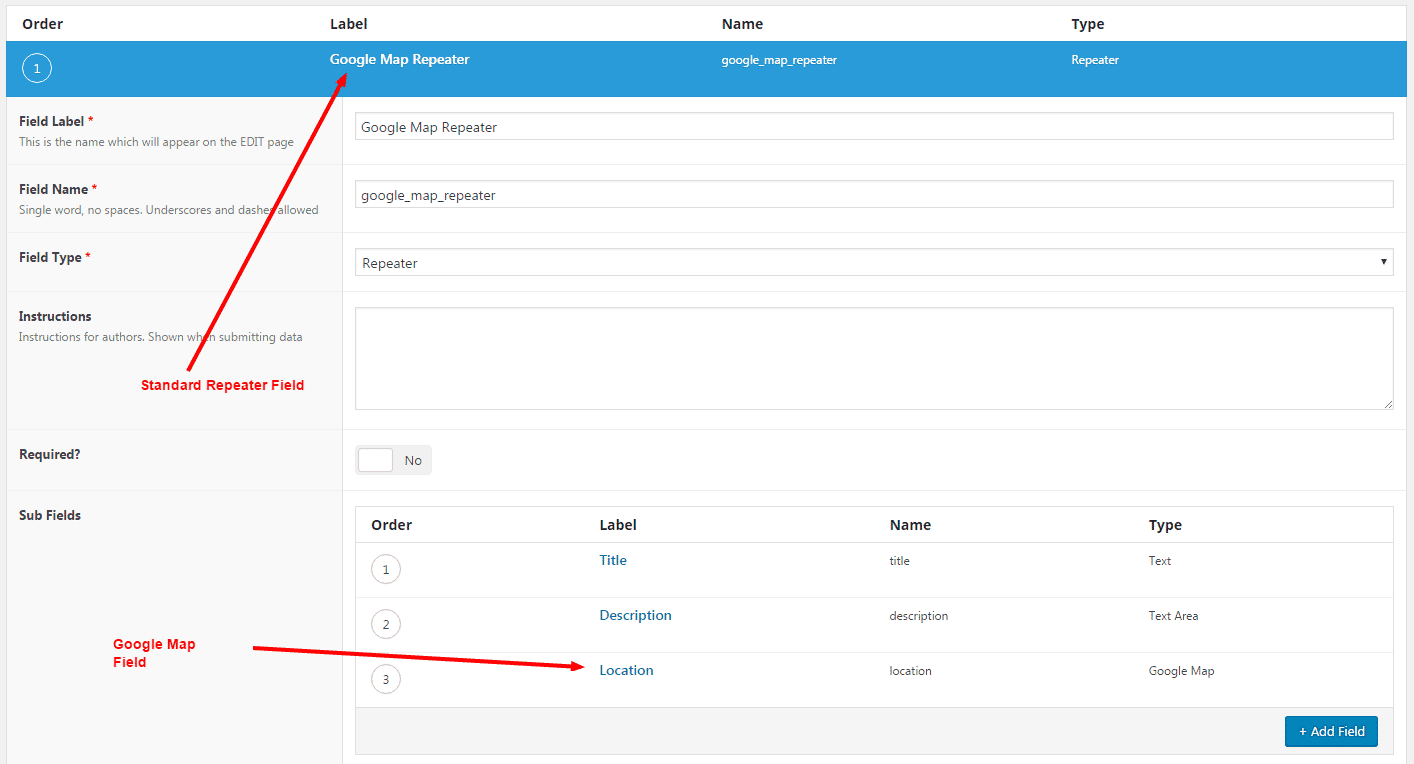
First, let’s create an ACF repeater field. Inside this repeater we’ll include a title, description and Google Map field. For this example we will display this repeater on a page, but this same technique could be used on posts (with or without the repeater). If used on posts or custom post types, you could create a map showing all locations from all posts or custom post types which could be another great feature for your site. We’ll save that for another tutorial.
Here is what the fields look like:
To plot the locations on a Google Map using Advanced Custom Fields we’ll need to do a few things:
- Create the PHP/HTML that renders the data from the repeater
- Create javascript to render the Google Map
- Create a Google API Key
- Ensure the HTML used in the repeater output coordinates with the values set in the javascript
Outputting the information from the Google Map Repeater fieldset
The first thing we need to do is create the PHP/HTML to output the data from our repeater field. Below is a snippet that will do just that.
<?php if( have_rows('google_map_repeater') ): ?>
     <div class="acf-map">
          <?php while ( have_rows('google_map_repeater') ) : the_row(); ?>
	       <?php $location = get_sub_field('location'); ?>
               <div class="marker" data-lat="<?php echo $location['lat']; ?>" data-lng="<?php echo $location['lng']; ?>">
                    <h4><?php the_sub_field('title'); ?></h4>
                    <p class="address"><?php echo $location['address']; ?></p>
                    <p><?php the_sub_field('description'); ?></p>
               </div>
          <?php endwhile; ?>
     </div>
<?php endif; ?>
First, the code checks to see if the “google_map_repeater” field-set has any data. If is does, it loops through each row and outputs the corresponding information. If it doesn’t, it simply doesn’t output anything. Using this technique allows us to place this snippet in our normal page template and it will only show when the Google Map Repeater field is used.
Notice the loop is surrounded in a div with a class of “acf-map” and each item within the loop has a class of “marker“. These are both important classes that we will reference in the javascript later.
Creating the Google Map
Next, we’ll create the javascript that will create the map and plot the locations defined by our repeater field.
<script src="https://maps.googleapis.com/maps/api/js?key=YOUR-API-KEY-HERE"></script>
<script type="text/javascript">
(function($) {

/*
*  new_map
*
*  This function will render a Google Map onto the selected jQuery element
*
*  @type	function
*  @date	8/11/2013
*  @since	4.3.0
*
*  @param	$el (jQuery element)
*  @return	n/a
*/
function new_map( $el ) {

	// variables
	var $markers = $el.find('.marker');
	var args = {
		zoom		: 16,
		center	: new google.maps.LatLng(0, 0),
		mapTypeId	: google.maps.MapTypeId.ROADMAP
	};

	// create map
	var map = new google.maps.Map( $el[0], args);

	// add a markers reference
	map.markers = [];

	// add markers
	$markers.each(function(){
    		add_marker( $(this), map );
	});

	// center map
	center_map( map );

	// return
	return map;
}

/*
*  add_marker
*
*  This function will add a marker to the selected Google Map
*
*  @type	function
*  @date	8/11/2013
*  @since	4.3.0
*
*  @param	$marker (jQuery element)
*  @param	map (Google Map object)
*  @return	n/a
*/
function add_marker( $marker, map ) {

	// var
	var latlng = new google.maps.LatLng( $marker.attr('data-lat'), $marker.attr('data-lng') );

	// create marker
	var marker = new google.maps.Marker({
		position	: latlng,
		map			: map
	});

	// add to array
	map.markers.push( marker );

	// if marker contains HTML, add it to an infoWindow
	if( $marker.html() )
	{
		// create info window
		var infowindow = new google.maps.InfoWindow({
			content		: $marker.html()
		});

		// show info window when marker is clicked
		google.maps.event.addListener(marker, 'click', function() {
			infowindow.open( map, marker );
		});
	}
}

/*
*  center_map
*
*  This function will center the map, showing all markers attached to this map
*
*  @type	function
*  @date	8/11/2013
*  @since	4.3.0
*
*  @param	map (Google Map object)
*  @return	n/a
*/
function center_map( map ) {

	// vars
	var bounds = new google.maps.LatLngBounds();

	// loop through all markers and create bounds
	$.each( map.markers, function( i, marker ){
		var latlng = new google.maps.LatLng( marker.position.lat(), marker.position.lng() );
		bounds.extend( latlng );
	});

	// only 1 marker?
	if( map.markers.length == 1 ) {
		// set center of map
	    map.setCenter( bounds.getCenter() );
	    map.setZoom( 16 );
	} else {
		// fit to bounds
		map.fitBounds( bounds );
	}
}

/*
*  document ready
*
*  This function will render each map when the document is ready (page has loaded)
*
*  @type	function
*  @date	8/11/2013
*  @since	5.0.0
*
*  @param	n/a
*  @return	n/a
*/
// global var
var map = null;
$(document).ready(function(){

	$('.acf-map').each(function(){
		// create map
		map = new_map( $(this) );
	});
});

})(jQuery);
</script>
I know, this is a lot of code. Let’s go through it piece by piece.
Add Google Maps API script
The first portion of code has a script that includes the Google Maps API key. You’ll need to go here to create your API key. Once you have your API simply replace “YOUR-API-KEY-HERE” with your API key. Using your own unique API will help ensure the map works properly every time the page loads.
Create the Map
The next part of the code includes the functions that handle the creation and rendering of the map and locations. First, you will see a function called “new_map“. This function actually creates the map. Additionally, you will notice a variable called $markers. This variable looks through the page for each item with a class of “marker” which, based on our previous code, will include each of our locations.
Next it sets a few of the map args including the zoom level, the positioning and the map type. Additional args can be found on this page under the MapOptions heading.
This function creates the variable for the map, runs a loop on each $marker with the “add_marker” function and runs the “center_map” function, both of which will be discussed later. While this seems like a lot to grasp, if you look at it piece by piece it is pretty simple.
Add the Locations to the Map
The next function is “add_marker“. As noted previously, this function is run on each location. It uses the latitude and longitude provided in the Google Map repeater field to set the latitude and longitude for each marker on the map. Additionally, it creates an “InfoWindow” to include other information. In this case, it includes the title and description we specified in the repeater field. Then, we add a listener to open the InfoWindow when the marker is clicked.
Note: You could add as much information to this InfoWindow as you’d like. Simply add more fields to your repeater and add the corresponding code to the repeater output.
Center the map based on the Locations
The next function is “center_map“. This function essentially looks at all the markers that have been placed and centers the map around those markers. This is important so the map is focused in the area of the markers for each location. It will automatically ensure that all markers are visible, regardless of how far away they actually are from each other.
Output the Map
Finally, there is a small jQuery function that outputs the map directly in the div with the class of “acf-map” which we referenced earlier.
Let’s add some CSS
Below is a small amount of CSS that will help style the newly created map. In this example I’ve set the height of the map to been 100% the vertical width of the page less the height of the title container (115px). You can easily modify this to your liking and even style the InfoWindow if you’d like.
.acf-map {
	width: 100%;
	height: calc(100vh - 115px);
	border: #ccc solid 1px;
	margin: 20px 0;
}
Conclusion on Plotting Locations on a Google Map
Adding a dynamic Google Map with plotted locations can be a great addition to your website. Advanced Custom Fields makes this even simpler with their Google Map field. Whether you want to show a list of locations on a page or post, this technique makes it fairly simple to setup. This technique could be modified to display locations for a set of posts or custom post types as well.
Question? Leave a comment below!
Hi,
Working example link is dead -> https://whiteleydesigns.com/acf-google-map-page/
Could you please make the example link work?
Cheers,
Link fixed!