In an ongoing effort to limit the number of plugins I use during development I’ve decided to create my own simple email lightbox popup for a number of sites. Nearly all sites need some way to capture email addresses. One of the simple and most effective ways is to create an email lightbox popup encouraging users to join your mailing list. In this tutorial I will address the following:
- Creating the basic HTML & CSS to create the lightbox and lightbox container.
- Explain how to have it automatically show after a set amount of time
- Explain how to implement cookies so the popup isn’t persistent for users who decline or sign up
- Explain different methods on limiting your lightbox to specific pages
A few quick notes before I dive in:
- This tutorial assumes you are using Gravity Forms as your form plugin. It is doable with any form plugin, but this is specific to Gravity Forms.
- The display of the email lightbox will be done using Genesis hooks. Again, any theme can easily implement this, but this tutorial uses Genesis hooks to insert the lightbox.
Creating the Email Lightbox Popup and hooking it in to your Genesis Theme
First, we’re going to write some simple HTML to create a container for the email lightbox, which will be in a fixed position and will take up 100% of the screen both vertically and horizontally. The container div will be black with a 70% opacity so when the lightbox is open it gives a dark cover to the site behind the lightbox. Inside of that will be the HTML for the actual lightbox which will includes an image, some text, and the shortcode to display our Gravity Form. Below is the HTML I am working with on a current site as a good starting point:
<div class="email-popup-con">

     <div class="email-popup-inner-con">
          <div class="email-popup-img-con">
               <img src="LINK TO IMAGE HERE" alt="Email Subscribe Image">
               <div class="message-overlay-con">
                    <span class="message">Join Our Mailing List</span>
                    <span class="nothanks">No Thanks</span>
               </div>
          </div>
          <?php echo do_shortcode( 'SHORTCODE FOR YOUR FORM HERE' ); ?>
     </div>

</div>
You’ll need to input your own image URL as well as the proper shortcode for the form you’d like to use. Then save this code in a file called email-popup.php.
My preferred placement for this code is at the very bottom of the document so to display it I hook in to genesis_after_footer action to place this code directly after the footer. Here is the PHP that will go directly in your functions.php file to accomplish that:
<?php
//* GENESIS -- Add email subscription popup section
add_action( 'genesis_after_footer', 'wd_email_popup' );
function wd_email_popup() {
	get_template_part( 'sections/email-popup' );
}
Note: Change the path in the get_template_part to the path of your file. In my example I have the email-popup.php file in a folder in my child theme called ‘sections’.
Styling the Email Lightbox
Next, we’ll need to add some CSS to pretty things up. Below is the CSS I’ve used before which you can modify as needed. This should be added to the style.css file in your child theme.
.email-popup-con {
display: none;
position: fixed;
top: 0;
left: 0;
right: 0;
bottom: 0;
background-color: rgba(0,0,0,0.7);
z-index: 100;
}
.email-popup-inner-con {
width: 750px;
max-width: 75%;
background-color: #fff;
position: absolute;
top: 50%;
left: 50%;
transform: translate(-50%, -50%);
}
.email-popup-img-con,
.email-popup-img-con img {
float: left;
width: 100%;
position: relative;
}
.email-popup-img-con::after {
content: " ";
position: absolute;
top: 0;
left: 0;
right: 0;
bottom: 0;
background-color: rgba(0,0,0,0.6);
}
.message-overlay-con {
position: absolute;
top: 50%;
left: 0;
transform: translateY(-50%);
padding: 0 25px;
width: 100%;
text-align: center;
z-index: 1;
}
.email-popup-img-con .message {
display: block;
color: #eee;
font-weight: 800;
text-transform: uppercase;
font-size: 50px;
line-height: 50px;
}
.email-popup-img-con .nothanks {
display: inline-block;
color: #ccc;
text-transform: uppercase;
margin-top: 5px;
font-weight: 600;
}
.email-popup-img-con .nothanks:hover {
color: #fff;
cursor: pointer;
}
.email-popup-inner-con .gform_wrapper {
padding: 25px;
}
.email-popup-inner-con div.gform_wrapper label.gfield_label {
display: none;
}
.email-popup-inner-con div.gform_wrapper .gform_footer .gform_button,
.email-popup-inner-con div.gform_wrapper .gform_page_footer .button {
width: 100%;
background-color: #da842b;
padding: 10px;
font-size: 24px;
}
.email-popup-inner-con div.gform_wrapper .gform_footer .gform_button:hover,
.email-popup-inner-con div.gform_wrapper .gform_page_footer .button:hover {
background-color: #ec9840;
}
.email-popup-inner-con div.gform_wrapper input[type="email"],
.email-popup-inner-con div.gform_wrapper input[type="text"],
.email-popup-inner-con div.gform_wrapper select {
background-color: transparent;
border: 2px solid #ccc;
color: #777;
padding: 15px;
border-radius: 5px;
}
.email-popup-inner-con .gform_confirmation_message {
color: #fff;
border: none;
background-color: #538594;
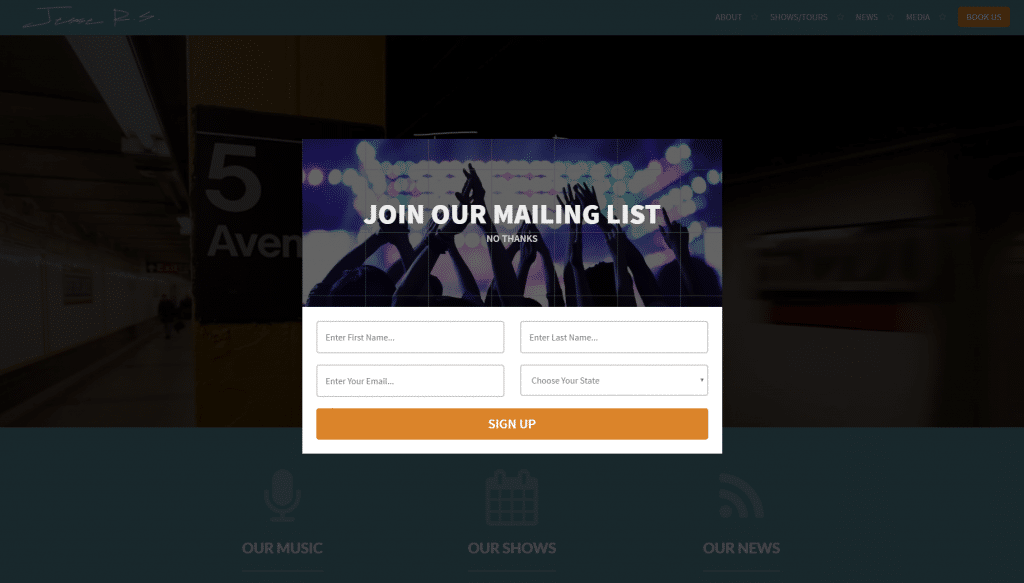
}And here is what it will look like.
Note: Your lightbox will look different depending on the form you use, your default button styling, the image you use and any other CSS that may override what is written above.
Displaying your Email Lightbox Popup
Now that we’ve created and styled the lightbox we’ll need to control how, when and where it is displayed. Currently it is hidden via the ‘display:none;’ declaration on the container. First, we’ll address how and when it is displayed using jQuery. The simple snippet below will force the lightbox to “fade in” after the user is on the page for 5 seconds. Also, it will allow the user to click the ‘No Thanks’ text to hide the lightbox. This code should be added to the bottom of the email-popup.php file we initially created:
<script>
jQuery(document).ready(function() {
  jQuery('.email-popup-con').delay(5000).fadeIn();
  jQuery('.nothanks').click(function() {
    jQuery('.email-popup-con').fadeOut();
  });
});
</script>
Now this alone WILL work, but there are other things to account for. If the user clicks ‘No Thanks’ they shouldn’t be forced to see this popup on every page of the site and every time they visit the site. Additionally, if someone signs up for your email list they shouldn’t continue to see this popup. This is where cookies come in to play. I use a simple, light-weight Javascript API to handle cookies (original found here).
First, you’ll want to take this file and drop it in to a folder called ‘js’ in your child theme (if it doesn’t exist simply create it).
Then you can use the function below to properly enqueue the file which ensures it is loaded on your site. The code below should be added to the functions.php file in your child theme.
<?php
add_action( 'wp_enqueue_scripts', 'wd_enqueue_scripts' );
function wd_enqueue_scripts() {
	wp_register_script( 'wd-cookie', get_stylesheet_directory_uri() . '/js/jquery.cookie.js' );
	wp_enqueue_script( 'wd-cookie' );
}
Properly Setting Cookies on the Email Lightbox Popup
Now that we’ve enqueue’d the jQuery cookie script we’re set to finish this up. We’re going to add to the jQuery we created above to account for two situations:
- If the user clicks ‘No Thanks’ we will hide the lightbox and set a 30-day cookie so the user won’t see the message again for 30 days.
- If the user successfully signs up for your mailing list we will set a 365-day cookie to hide the message for a year
Below is the modified jQuery to accomplish this:
<script>
jQuery(document).ready(function() {
  // Functionality that controls hiding/showing the email signup lightbox
  // Check to see if cookie is set prior to showing email signup after 5 second delay
  if( Cookies.get('noti') !== 'closed' ) {
    jQuery('.email-popup-con').delay(5000).fadeIn();
  }
  // If user closes lightbox set cookie for 30 days to not show again
  jQuery('.nothanks').click(function() {
    Cookies.set('noti', 'closed', { expires: 30 });
    jQuery('.email-popup-con').fadeOut();
  });
  // Hides the email submit form 3 seconds after a successful submission and sets 1 year cookie to disable popup
  jQuery(document).bind('gform_confirmation_loaded', function(event, formId){
    if(formId == 3) {
      Cookies.set('noti', 'closed', { expires: 365 });
      setTimeout(function() {
        jQuery('.email-popup-con').fadeOut();
      }, 3000);
    }
  });
});
</script>
There are three parts to this snippet:
- If there is not a cookie set with the name of ‘noti’ and the value of ‘closed’ the lightbox will show after 5 seconds.
- If the user clicks the ‘No Thanks’ text a cookie is set with the name of ‘noti’ and a value of ‘closed’ and the lightbox is hidden. This cookie is set for 30 days.
- If the user successfully signs up for the email list a cookie is set with the name of ‘noti’ and a value of ‘closed’ and the lightbox is hidden. This cookie is set for 365 days.
So basically, if the user has not either clicked ‘No Thanks’ or successfully signed up for the email list they will see the lightbox after 5 seconds on the site. If either of those actions have been taken, a cookie has been set and the lightbox will not show. The length of the cookie is significantly longer for someone who joined the email list.
Note: Make sure you change the Form ID to the ID of the form you’d like to use.
Controlling Where Your Email Lightbox is Displayed
There are a variety of ways to choose where your lightbox will be shown. One method would be to ignore the part about using the Genesis hook to put it below the footer and simply include it in each page template you’d like it to show in. This method would work, but would become difficult to maintain on larger sites. Ideally, we control it all in one location – the functions.php file.
My preferred method would be to use conditional statements wrapped around the genesis_after_footer action we’ve already created. Using conditional statements will allow us to use the function we’ve already written by limiting it to only run in certain circumstances. Below is an example of how to only have it show on single blog posts:
<?php
//* GENESIS -- Add email subscription popup section
add_action( 'genesis_after_footer', 'wd_email_popup' );
function wd_email_popup() {
        if( is_single() ) { // Only show this on single blog posts
	        get_template_part( 'sections/email-popup' );
        }
}
You could similarly use any combination of things like is_page(), is_archive(), or any of the other built-in WordPress Conditional Tags to dynamically display your lightbox as needed.
You could even create multiple versions of the lightbox with different forms, pictures and text and display them throughout your site based on your site’s needs. The options really are limitless.
Closing and References
While there are a lot of moving pieces here, it is a relatively simple approach to creating a simple lightbox. Instead of bloating your site with another plugin, this approach is lightweight and easy to customize. Below are some references and resources:
Link to Cookie Javascript Documentation on GitHub
Link to Javascript Cookie Script on my GitHub
Learn about gform_confirmation_loaded used in the jQuery
As always, if you have any questions or comments certainly leave them in the comments below!
Cheers.
Thanks for the article. Get a lot from this.
Great tutorial.
Can this work for Newspaper 9 WP Theme ?
Hey Maroy – it would work with pretty much any WordPress site but if you aren’t using Genesis you would need to modify the hooks to hook in to something offered by the theme you are using. Cheers!
I am using generatepress theme. I will like to have it pop out when someone clicks a button on my blog.
I don’t want it to automatically popup after sometime unless a button is clicked for newsletter subscription
Hey,
For that you would simply want to use some jQuery to target the click and completely remove all the cookie-related stuff in this post.
Something like
// Open lightbox on div/button click

jQuery('.your-class').click(function() {

  jQuery('.email-popup-con').fadeIn();

});
This is great, thanks!
However, it’s not working on mobile for me. Any suggestions?
Great stuff. I found this post after searching for a better way to implement email pop up form for subscribers. I’m not a coder but was able to get this working on my wordpress site. I have been reducing my need for extra plugins and wanting better performance on my site and this is a wonderful solution.
I know this is pretty old, but is there any new updates to the code? Is there an easy way to add a close button or X to allow users easier access to continue onto my site?
Thank you
Hey Rocco,
The “No Thanks” portion of the code is what closes the modal. You could replace that with an X, or a icon of an X or whatever, and then trigger that to close the modal.
So, all the code that you need is there, you would just want to swap out the “No Thanks” text with your X and then use CSS to appropriately style it as needed.
All the best,
Matt
hi Matt
Thanks for the reply. Is there anyway to allow the user to still interact with the site even with the lightbox open, or self close if user clicks behind the box? Just don’t want to completely stop the user experience while its up.
Thanks. So glad I found your site.
Hey Rocco,
Sure, you could modify it to close the modal when you click outside the box. You could adapt code from this snippet to accomplish it:
https://whiteleydesigns.com/code/hide-container-when-click-outside-target-with-jquery/
Hopefully this points you in the right direction.
Matt
Where to write this code
Thanks. This was great.
A quick question from someone new to all of this. If I had multiple forms and wanted to click on a button for each to invoke them. How would I go about doing that?
I have looked at content on the web and AJAX seems to be the common solution, however, no matter what I try I can’t get it to work. Any advice would be appreciated.
Hey Tim,
There would be a few ways to do this AJAX would be one. You could also create multiple lightboxes with different classes and target different classes with different buttons.
Depending how you are generating the buttons that may be difficult.
My approach would probably be adding something like a `data-target` attribute to each button. Then add some jQuery that checks the data-target and associates that with the form you want to show. Within the lightbox container you could put all your forms and have them all hidden, then when the lightbox shows it checks the data-target attribute of the button you clicks and shows the proper form.
Hopefully that points you in the right direction.
Matt
Hi Matt,
Thanks. That worked like a charm.
Ta,
Tim.