In a recent project I was asked the best way to promote upcoming camp programs for an athletic facility. One option was to add a new section to the home page. This would be a bit out-of-flow and we felt it wasn’t the best approach. We decided to use a simple light-box that would show on the home page after a few seconds. This approach would allow maximum exposure for the camp without disrupting the current flow of the home page. The client would be able to easily change the graphic and the page the graphic linked to, based on the upcoming camp program.
Another discussion during preparation for the project was regarding removing the light-box after the camp registration period was over. In the past, I would have suggested they (or I) set a reminder and manually go remove it, but in this case I decided to integrate a datepicker field to create a date controlled lightbox. This way the user could easily choose the date they want the light-box to stop displaying during the initial setup, and not worry about it down the road.
Setting up the fieldset in Advanced Custom Fields
The first thing to do is setup the proper fields. In this case all we needed was an image field, a URL (or Relationship Page) field, and a jQuery datepicker field. This allows us to upload an image, choose where it links, and choose when to stop showing it.
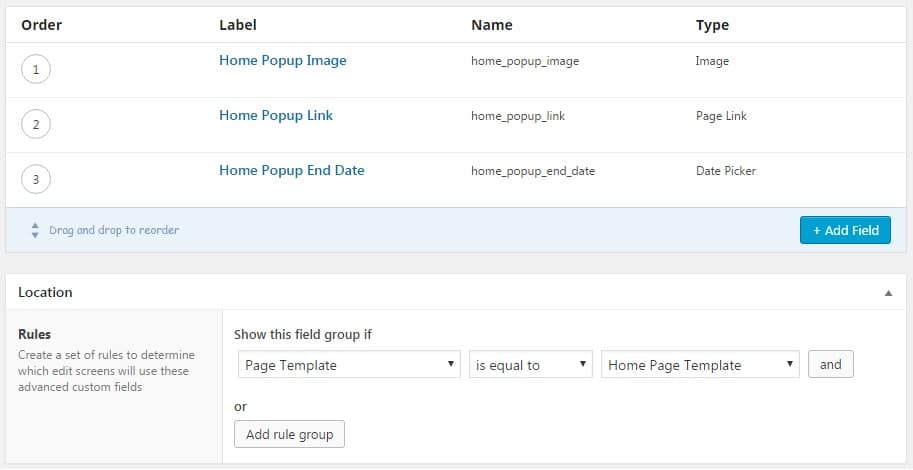
As you can see, we have three fields setup as well as logic to show this field group only on the home page. One other thing to note: make sure you set the return format of your jQuery Datepicker to Ymd as shown below. This will come in to play later when creating the conditional code.

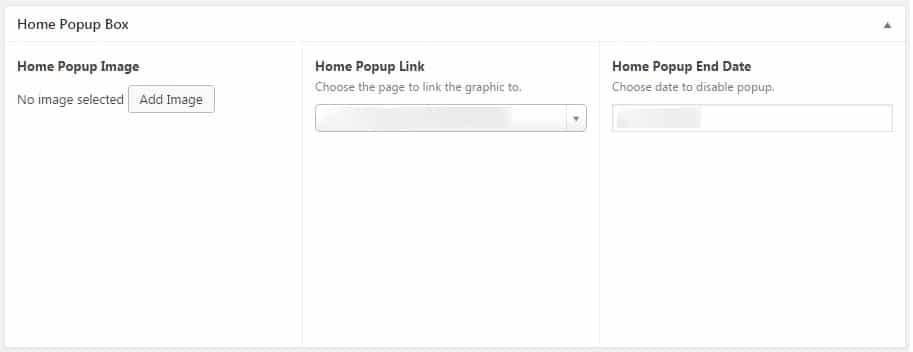
Below is what we end up with on the home page. This allows the client to easily add the image, choose a page it links to, and set an end date.
Creating the date controlled lightbox
Now that we have the Advanced Custom Fields in place we need to create the code to display them conditionally, based on the date field. The first thing I like to do when working with ACF is to put each of my fields in to a variable. This makes it a bit easier to use them throughout the code. This is just my personal preference.
<?php // ACF Fields
$home_popup_image = get_field( 'home_popup_image' );
$home_popup_link = get_field( 'home_popup_link' );
$home_popup_end_date = get_field( 'home_popup_end_date' );
This sets each custom field as a variable. Next, we’ll create the popup. For simplicity sake, I’m not going to include any CSS, so you’ll need to style it on your own. This basic HTML will create the structure for the lightbox and output the custom fields for the link and the image. You’ll notice a few if statements wrapped around the opening and closing anchor tags. That is allows the user to exclude the page link if desired. If no page is selected on the back end the code won’t output the anchor tags.
<?php // ACF Fields
$home_popup_image = get_field( 'home_popup_image' );
$home_popup_link = get_field( 'home_popup_link' );
$home_popup_end_date = get_field( 'home_popup_end_date' );
?>
<div class="email-signup-lightbox-con">
     <div class="email-signup-lightbox">
          <div class="close-lightbox"></div>
          <?php if( $home_popup_link ) : ?>
               <a href="<?php echo $home_popup_link; ?>">
          <?php endif; ?>
          <img src="<?php echo $home_popup_image['url']; ?>" alt="<?php echo $home_popup_image['alt']; ?>">
          <?php if( $home_popup_link ) : ?>
               </a>
          <?php endif; ?>
     </div>
</div>
Now that we have our light-box in place we’ll wrap it in an if statement that compares the current date with the date selected on the back end. If the end date is less than or equal to the value we chose to stop showing it will return false and now show our light-box. Otherwise, it will output the lightbox code.
<?php // ACF Fields
$home_popup_image = get_field( 'home_popup_image' );
$home_popup_link = get_field( 'home_popup_link' );
$home_popup_end_date = get_field( 'home_popup_end_date' );
?>

<?php if( $home_popup_end_date >= date('Ymd' ) ) : // If the end date of the popup date field is in the future show this ?>

     <div class="email-signup-lightbox-con">
          <div class="email-signup-lightbox">
               <div class="close-lightbox"></div>
               <?php if( $home_popup_link ) : ?>
                    <a href="<?php echo $home_popup_link; ?>">
               <?php endif; ?>
               <img src="<?php echo $home_popup_image['url']; ?>" alt="<?php echo $home_popup_image['alt']; ?>">
               <?php if( $home_popup_link ) : ?>
                    </a>
               <?php endif; ?>
          </div>
     </div>

<?php endif; ?>
Lastly, we’ll add a little jQuery that will fade the light-box in after a 2 second delay and fade the light-box out when the ‘close lightbox’ div is clicked. You’ll notice the jQuery goes within the if statement for the date check. This ensures the script is only output if the light-box is needed, ensuring better performance.
<?php // ACF Fields
$home_popup_image = get_field( 'home_popup_image' );
$home_popup_link = get_field( 'home_popup_link' );
$home_popup_end_date = get_field( 'home_popup_end_date' );
?>

<?php if( $home_popup_end_date >= date('Ymd' ) ) : // If the end date of the popup date field is in the future show this ?>

     <div class="email-signup-lightbox-con">
          <div class="email-signup-lightbox">
               <div class="close-lightbox"></div>
               <?php if( $home_popup_link ) : ?>
                    <a href="<?php echo $home_popup_link; ?>">
               <?php endif; ?>
               <img src="<?php echo $home_popup_image['url']; ?>" alt="<?php echo $home_popup_image['alt']; ?>">
               <?php if( $home_popup_link ) : ?>
                    </a>
               <?php endif; ?>
          </div>
     </div>

     <script>
     jQuery(document).ready(function() {
          jQuery('.email-signup-lightbox-con').delay(2000).fadeIn();
          jQuery('.close-lightbox').click(function() {
               jQuery('.email-signup-lightbox-con').fadeOut();
          });
     });
     </script>

<?php endif; ?>
It would be pretty simple to expand upon this to add a start and end date, but this should give you a good starting point for an easy to use date controlled lightbox with Advanced Custom Fields. Other ideas would be using this on an ACF options page and using it site-wide, or allowing it on any page so you could have different light-boxes on different pages.
Making things simpler for the end user keeps them happy and makes your support job much simpler! Hopefully this tutorial helps you in an upcoming project.